Yes, it's Pioneer Woman again. However, I did the recipe some time ago. Steve helped me which made this recipe much easier. It can be done alone, but a couple of extra hands does make the job go a little faster.
Simple, Perfect Enchiladas
Page 176 cookbook
PW's Blog - Enchiladas
My family loved them and wants me do it again soon. It is time consuming and without help, I don't know that would do this on a weeknight again. I think next time I make them, I will double the batch and put a tray in the freezer. It wouldn't be that much more work. That would make for a fast weeknight dinner.
Have a good evening and give this a try. It's worth it.
Saturday, March 13, 2010
Thursday, March 11, 2010
Pot Roast is what's for dinner
Here is the first installment of my reviews of "The Pioneer Woman Cooks." I sort of feel like the movie "Julie and Julia." I plan to work my way through most of the Pioneer Woman's recipes in the cookbook. Since I have followed her blog for awhile now, I have had a head start. I didn't bother taking any pictures, but I am including the links to her blog.
The Perfect Pot Roast.
Page 120 of the cookbook
PW's Blog - Pot Roast
She not only has this on her blog and in her cookbook but she demo'd it on Good Morning America a couple of weeks ago. When I saw her put her hand in the pot to flip the roast I thought this is my kind of cooking. It was fast, easy and turned out wonderful. Most important, the kids loved it.
I ended up getting a 5 lb chuck roast on sale for around $8. It was enough for 2 dinners and a lunch for Steve. You do the math, this was a great deal.
Go get her book or check out her blog. This is definitely a do again recipe.
Friday, February 5, 2010
What's for Dinner tonight
Oh My, has it really been September since my last post. I swear I have been cooking. lol
Tonight, I was going to start a series of reviews of my latest favorite cookbook. If you follow my other blog you would have seen first hand the drama surrounding the arrival of this cookbook. Long story short. I ordered it for a Christmas gift to myself and it didn't get here in time. Now I have two and enough said about that.
The cookbook is "The Pioneer Woman Cooks" by Ree Drummond. She also has a blog that I have been following from about the time she started. Tonight will not be the night to start my review. I had camera ready to cook and take pictures of her enchiladas.
About 2pm my husband got his call to go to work and suddenly enchiladas sounded like to much work for just me and the kids. This is really the way it goes in this house. I always have some easy backup meal on hand. Sometimes it's just McDonalds but we won't talk about that.
Tonight's back up meal is pizza. Yes, home made pizza is not as hard as you may think. Sometimes I make the dough with my mixer and if I am really lazy I use my bread machine. Both ways are really easy, just the bread machine is done quicker. I don't buy prepared pizza crust. Since the ingredients are basic I usually have them on hand.
Here is the recipe:
9-11 ounces of warm water
3/4 teaspoon of salt
3 tablespoons of Olive Oil or Vegetable Oil (I use Olive Oil)
4 cups of All purpose flour
2 teaspoons Active dry yeast
Combine all ingredients into you bread machine, select the dough setting and away you go. You can even do this in the morning and set the machine's timer to be done when you want.
Pat the dough into a 12x15 inch jelly roll pan and let it stand for 10 minutes. Preheat oven to 400F, spread pizza sauce (I am using spaghetti sauce tonight) over dough and then your favorite toppings.
Bake 15 to 20 minutes or until the crust is golden brown.
My toppings tonight are going to be Mozzarella cheese and salami. My family is not hard to please. Another favorite is to spread ranch dressing for the sauce and top with olives, chicken and cheese. Yummmm!!
I will take a picture and post that later. Enjoy.
Monday, September 7, 2009
A Zucchini Kind of Day
The only thing that seems to be growing in my garden is the zucchini. What to do with all of this. Well, I spent some time online looking for some recipes and I have come up with quite a list of things to make.
Death by Chocolate Zucchini Cake
Fried Zucchini Strings
Chocolate Chip Zucchini Bread
Regular Zucchini Bread (my recipe and a favorite)
and yes some good healthy zucchini choices but I am not into making those right now.
I will be making all of these over the next couple of days, but I started with just one. Any guesses as to which one.
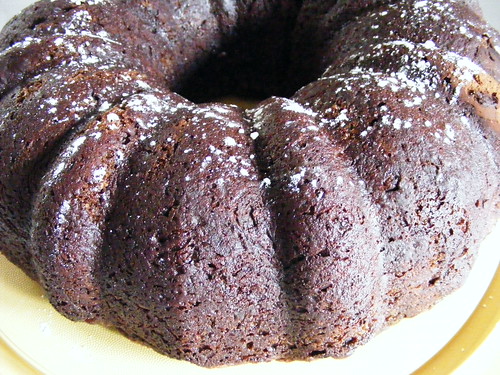
Death by Chocolate Zucchini Cake
My kids where a little bit shy about trying this. They saw what the batter looked like before it went into the oven. They tried a bite and loved it. Anthony on the other hand says it tastes funny but I am pretty sure it's because he knows the zucchini is in there. I love it and it is wonderful. I am definitely making this again. So without any more delays here is the recipe.
Death By Chocolate Zucchini Cake **
½ cups Buttermilk (sour Cream & Yogurt Are Acceptable Substitutions)
½ cups Oil
1-¾ cup Sugar
2 whole Eggs
1 Tablespoon Vanilla
2-½ cups Flour
4 Tablespoons Cocoa Powder
½ teaspoons Baking Powder
1 teaspoon Baking Soda
1 box(es) (small) Chocolate Pudding
2 cups Shredded Zucchini
½ bags Your Favorite Chocolate Chips
Preheat oven to 350 degrees. Combine the first 5 ingredients in a large bowl. Mix until well blended. Add the next 5 ingredients, mixing well with each addition. Add the zucchini and mix well. Finally, add the chocolate chips and mix it all up one more time.
For CAKE:Grease and flour a bundt pan. (Instead of using flour as a release agent, use cocoa powder. It won’t leave those white marks on the top of the cake!) Pour mixture into bundt pan. Depending on the size of your bundt pan, you will need to watch how closely you fill the pan. If it looks like the batter will fill your pan too full, line or grease and flour a muffin tin and make 6 cupcakes in addition to your bundt cake. Trust me, those muffins will come in handy for a delicious, semi-guiltless breakfast!
Bake at 350 degrees for 50-60 minutes or until a toothpick inserted in the middle of the cake comes out clean. Let cool on cooling rack for 10 minutes, then invert onto a plate and let cool.*
Dust with confectioner’s sugar.
*This cake tastes just as good served warm!
FOR MUFFINS/cupcakes:Grease a muffin tin or line muffin tin with paper cupcake liners. Fill 1/2 to 3/4 full depending on how big you like your muffins. Bake at 350 degrees for about 20 minutes. Let sit in tin for 5 minutes then remove muffins to cooling rack. Dust tops of muffins with confectioner’s sugar. This recipe yields anywhere between 2 and 3 dozen muffins/cupcakes.
If you make cupcakes and only have one muffin tin, make sure to stir the batter before refilling your muffin tin - the batter tends to thin out a bit and the chocolate chips all sink to the bottom. But if you want your last batch to have TONS Of chocolate chips, ignore this warning.
Note: Accidentally adding too much zucchini does not detract from the tastiness of this recipe. It will thin the batter out a bit, but it still holds up after baking and you don’t even notice the extra zucchini - in fact, it may make the cake even moister!
**This recipe was found on Pioneer Womans Tasty Kitchen website (link found on the right of this post) and was added by jennieinpa. Thanks jennieinpa a great recipe.
Death by Chocolate Zucchini Cake
Fried Zucchini Strings
Chocolate Chip Zucchini Bread
Regular Zucchini Bread (my recipe and a favorite)
and yes some good healthy zucchini choices but I am not into making those right now.
I will be making all of these over the next couple of days, but I started with just one. Any guesses as to which one.
Death by Chocolate Zucchini Cake
My kids where a little bit shy about trying this. They saw what the batter looked like before it went into the oven. They tried a bite and loved it. Anthony on the other hand says it tastes funny but I am pretty sure it's because he knows the zucchini is in there. I love it and it is wonderful. I am definitely making this again. So without any more delays here is the recipe.
Death By Chocolate Zucchini Cake **
½ cups Buttermilk (sour Cream & Yogurt Are Acceptable Substitutions)
½ cups Oil
1-¾ cup Sugar
2 whole Eggs
1 Tablespoon Vanilla
2-½ cups Flour
4 Tablespoons Cocoa Powder
½ teaspoons Baking Powder
1 teaspoon Baking Soda
1 box(es) (small) Chocolate Pudding
2 cups Shredded Zucchini
½ bags Your Favorite Chocolate Chips
Preheat oven to 350 degrees. Combine the first 5 ingredients in a large bowl. Mix until well blended. Add the next 5 ingredients, mixing well with each addition. Add the zucchini and mix well. Finally, add the chocolate chips and mix it all up one more time.
For CAKE:Grease and flour a bundt pan. (Instead of using flour as a release agent, use cocoa powder. It won’t leave those white marks on the top of the cake!) Pour mixture into bundt pan. Depending on the size of your bundt pan, you will need to watch how closely you fill the pan. If it looks like the batter will fill your pan too full, line or grease and flour a muffin tin and make 6 cupcakes in addition to your bundt cake. Trust me, those muffins will come in handy for a delicious, semi-guiltless breakfast!
Bake at 350 degrees for 50-60 minutes or until a toothpick inserted in the middle of the cake comes out clean. Let cool on cooling rack for 10 minutes, then invert onto a plate and let cool.*
Dust with confectioner’s sugar.
*This cake tastes just as good served warm!
FOR MUFFINS/cupcakes:Grease a muffin tin or line muffin tin with paper cupcake liners. Fill 1/2 to 3/4 full depending on how big you like your muffins. Bake at 350 degrees for about 20 minutes. Let sit in tin for 5 minutes then remove muffins to cooling rack. Dust tops of muffins with confectioner’s sugar. This recipe yields anywhere between 2 and 3 dozen muffins/cupcakes.
If you make cupcakes and only have one muffin tin, make sure to stir the batter before refilling your muffin tin - the batter tends to thin out a bit and the chocolate chips all sink to the bottom. But if you want your last batch to have TONS Of chocolate chips, ignore this warning.
Note: Accidentally adding too much zucchini does not detract from the tastiness of this recipe. It will thin the batter out a bit, but it still holds up after baking and you don’t even notice the extra zucchini - in fact, it may make the cake even moister!
**This recipe was found on Pioneer Womans Tasty Kitchen website (link found on the right of this post) and was added by jennieinpa. Thanks jennieinpa a great recipe.
Monday, August 3, 2009
Huckleberry (or Blueberry)Coffee Cake
What do you do when you buy too many blueberries ?

Blueberry coffee cake baby.
This reciepe can be used with either huckleberries or blueberries. I have done both and they are both super yummy. As you can see, I dug in before I remembered to take a picture.
Enjoy, this gets thumbs up from the whole family.
Huckleberry (or Blueberry) Coffee Cake
1/4cup butter, softened
1/2 (8oz) fat free cream cheese
1 c sugar
1 egg 1c flour
1tsp baking powder
1/4 tsp salt
1 tsp Vanilla extract
2 c fruit (fresh or frozen)
2 Tlbs sugar
1 tsp cinnamon
Beat butter & cream cheese add sugar and add egg
Combine flour, bake powder and salt; stir into butter mixture. Stir in vanilla then fold in berries.
Pour batter into 9" round cake pan coated w/ cooking spray.
Combine rest of sugar, cinnamon and sprinkle over batter.
Bake 350 for 1 hour
Sunday, July 26, 2009
Baking Challenge
The July Daring Bakers' challenge was hosted by Nicole at Sweet Tooth. She chose Chocolate Covered Marshmallow Cookies and Milan Cookies from pastry chef Gale Gand of the Food Network.

I thought it would be fun to join the Daring Bakers. Once a month they have a baking and a cooking challenge. So, because I just love to jump in head first without a second thought, I joined both the baking and cooking. They give you a challenge to do and you bake and post about it on your blog. Part of the rules is that you post on a certain date and not before. Well guess what, today is that day. The date to post is the 27th for the baking challenge.
This months challenge is Chocolate covered Marshmallow Cookies and Milan Cookies. We could choose one or do both. When I started off to do this challenge I was going to do both. As usual I put it off until after my parents and nephew arrived for a visit. So needless to say, I finished the challenge last night and I only did the Chocolate covered Marshmallow cookies. I will do the Milan Cookies another time.
I was a little intimated to start this because, let me tell you, the people on this website are VERY talented. No need to be intimated, this was a fun one to do. I don't normally do cookies that require being rolled out. The dough always sticks and I just can't figure it out. Well, I discovered my problem. I was pushing down to hard on my rolling pin.

Isn't this a great rolling pin. Our dear friend Andrew made this one day for me. I absolutely love it.
I also discovered that I don't have any circle cookie cutters. I will be ordering some this week. The challenge also gave you the choice between making your own marshmallow or just using store bought. Because I have visitor's and there was so many people coming and going through my kitchen I decided on store bought. The recipe calls for cutting large marshmallows in half and placing half on a cookie. I would recommend cutting the marshmallow in half from top to bottom. It looks better and fits the cookie better.
I found that the mallow recipe also makes more then the 2 dozen (I got about 5 dz) so I needed to use more chocolate then the recipe called for.
Here are both recipes, give them a try. This is something I would do again but next time I am going to make my own marshmallow.
Mallows
(Chocolate Covered Marshmallow Cookies)Recipe courtesy Gale Gand, from Food Network website
Prep Time: 10 min
Inactive Prep Time: 5 min
Cook Time: 10 min
Serves: about 2 dozen cookies
• 3 cups (375grams/13.23oz) all purpose flour
• 1/2 cup (112.5grams/3.97oz) white sugar
• 1/2 teaspoon salt
• 3/4 teaspoon baking powder
• 3/8 teaspoon baking soda
• 1/2 teaspoon ground cinnamon
• 12 tablespoons (170grams/ 6 oz) unsalted butter
• 3 eggs, whisked together
• Homemade marshmallows, recipe follows
• Chocolate glaze, recipe follows
1. In a mixer with the paddle attachment, blend the dry ingredients.
2. On low speed, add the butter and mix until sandy.
3. Add the eggs and mix until combine.
4. Form the dough into a disk, wrap with clingfilm or parchment and refrigerate at least 1 hour and up to 3 days.
5. When ready to bake, grease a cookie sheet or line it with parchment paper or a silicon mat.
6. Preheat the oven to 375 degrees F.
7. Roll out the dough to 1/8-inch thickness, on a lightly floured surface. Use a 1 to 1 1/2 inches cookie cutter to cut out small rounds of dough.
8. Transfer to the prepared pan and bake for 10 minutes or until light golden brown. Let cool to room temperature.
9. Pipe a “kiss” of marshmallow onto each cookie. Let set at room temperature for 2 hours.10. Line a cookie sheet with parchment or silicon mat.
11. One at a time, gently drop the marshmallow-topped cookies into the hot chocolate glaze.
12. Lift out with a fork and let excess chocolate drip back into the bowl.
13. Place on the prepared pan and let set at room temperature until the coating is firm, about 1 to 2 hours.
Note: if you don’t want to make your own marshmallows, you can cut a large marshmallow in half and place on the cookie base. Heat in a preheated 350-degree oven to slump the marshmallow slightly, it will expand and brown a little. Let cool, then proceed with the chocolate dipping.
Homemade marshmallows:
• 1/4 cup water
• 1/4 cup light corn syrup
• 3/4 cup (168.76 grams/5.95oz) sugar
• 1 tablespoon powdered gelatin
• 2 tablespoons cold water
• 2 egg whites , room temperature
• 1/4 teaspoon pure vanilla extract
1. In a saucepan, combine the water, corn syrup, and sugar, bring to a boil until “soft-ball” stage, or 235 degrees on a candy thermometer.
2. Sprinkle the gelatin over the cold water and let dissolve.
3. Remove the syrup from the heat, add the gelatin, and mix.
4. Whip the whites until soft peaks form and pour the syrup into the whites.
5. Add the vanilla and continue whipping until stiff.
6. Transfer to a pastry bag.
Chocolate glaze:
• 12 ounces semisweet chocolate
• 2 ounces cocoa butter or vegetable oil
1. Melt the 2 ingredients together in the top of a double boiler or a bowl set over barely simmering water.
Milan Cookies
Recipe courtesy Gale Gand, from Food Network website
Prep Time: 20 min
Inactive Prep Time: 0 min
Cook Time: 1 hr 0 min
Serves: about 3 dozen cookies
• 12 tablespoons (170grams/ 6 oz) unsalted butter, softened
• 2 1/2 cups (312.5 grams/ 11.02 oz) powdered sugar
• 7/8 cup egg whites (from about 6 eggs)
• 2 tablespoons vanilla extract
• 2 tablespoons lemon extract
• 1 1/2 cups (187.5grams/ 6.61 oz) all purpose flour
Cookie filling
• 1/2 cup heavy cream
• 8 ounces semisweet chocolate, chopped
• 1 orange, zested
1. In a mixer with paddle attachment cream the butter and the sugar.
2. Add the egg whites gradually and then mix in the vanilla and lemon extracts.
3. Add the flour and mix until just well mixed.
4. With a small (1/4-inch) plain tip, pipe 1-inch sections of batter onto a parchment-lined sheet pan, spacing them 2 inches apart as they spread.
5. Bake in a preheated 350 degree oven for 10 minutes or until light golden brown around the edges. Let cool on the pan.
6. While waiting for the cookies to cool, in a small saucepan over medium flame, scald cream.
7. Pour hot cream over chocolate in a bowl, whisk to melt chocolate, add zest and blend well.
8. Set aside to cool (the mixture will thicken as it cools).
9. Spread a thin amount of the filling onto the flat side of a cookie while the filling is still soft and press the flat side of a second cookie on top.
10. Repeat with the remainder of the cookies.
I thought it would be fun to join the Daring Bakers. Once a month they have a baking and a cooking challenge. So, because I just love to jump in head first without a second thought, I joined both the baking and cooking. They give you a challenge to do and you bake and post about it on your blog. Part of the rules is that you post on a certain date and not before. Well guess what, today is that day. The date to post is the 27th for the baking challenge.
This months challenge is Chocolate covered Marshmallow Cookies and Milan Cookies. We could choose one or do both. When I started off to do this challenge I was going to do both. As usual I put it off until after my parents and nephew arrived for a visit. So needless to say, I finished the challenge last night and I only did the Chocolate covered Marshmallow cookies. I will do the Milan Cookies another time.
I was a little intimated to start this because, let me tell you, the people on this website are VERY talented. No need to be intimated, this was a fun one to do. I don't normally do cookies that require being rolled out. The dough always sticks and I just can't figure it out. Well, I discovered my problem. I was pushing down to hard on my rolling pin.
Isn't this a great rolling pin. Our dear friend Andrew made this one day for me. I absolutely love it.
I also discovered that I don't have any circle cookie cutters. I will be ordering some this week. The challenge also gave you the choice between making your own marshmallow or just using store bought. Because I have visitor's and there was so many people coming and going through my kitchen I decided on store bought. The recipe calls for cutting large marshmallows in half and placing half on a cookie. I would recommend cutting the marshmallow in half from top to bottom. It looks better and fits the cookie better.
I found that the mallow recipe also makes more then the 2 dozen (I got about 5 dz) so I needed to use more chocolate then the recipe called for.
Here are both recipes, give them a try. This is something I would do again but next time I am going to make my own marshmallow.
Mallows
(Chocolate Covered Marshmallow Cookies)Recipe courtesy Gale Gand, from Food Network website
Prep Time: 10 min
Inactive Prep Time: 5 min
Cook Time: 10 min
Serves: about 2 dozen cookies
• 3 cups (375grams/13.23oz) all purpose flour
• 1/2 cup (112.5grams/3.97oz) white sugar
• 1/2 teaspoon salt
• 3/4 teaspoon baking powder
• 3/8 teaspoon baking soda
• 1/2 teaspoon ground cinnamon
• 12 tablespoons (170grams/ 6 oz) unsalted butter
• 3 eggs, whisked together
• Homemade marshmallows, recipe follows
• Chocolate glaze, recipe follows
1. In a mixer with the paddle attachment, blend the dry ingredients.
2. On low speed, add the butter and mix until sandy.
3. Add the eggs and mix until combine.
4. Form the dough into a disk, wrap with clingfilm or parchment and refrigerate at least 1 hour and up to 3 days.
5. When ready to bake, grease a cookie sheet or line it with parchment paper or a silicon mat.
6. Preheat the oven to 375 degrees F.
7. Roll out the dough to 1/8-inch thickness, on a lightly floured surface. Use a 1 to 1 1/2 inches cookie cutter to cut out small rounds of dough.
8. Transfer to the prepared pan and bake for 10 minutes or until light golden brown. Let cool to room temperature.
9. Pipe a “kiss” of marshmallow onto each cookie. Let set at room temperature for 2 hours.10. Line a cookie sheet with parchment or silicon mat.
11. One at a time, gently drop the marshmallow-topped cookies into the hot chocolate glaze.
12. Lift out with a fork and let excess chocolate drip back into the bowl.
13. Place on the prepared pan and let set at room temperature until the coating is firm, about 1 to 2 hours.
Note: if you don’t want to make your own marshmallows, you can cut a large marshmallow in half and place on the cookie base. Heat in a preheated 350-degree oven to slump the marshmallow slightly, it will expand and brown a little. Let cool, then proceed with the chocolate dipping.
Homemade marshmallows:
• 1/4 cup water
• 1/4 cup light corn syrup
• 3/4 cup (168.76 grams/5.95oz) sugar
• 1 tablespoon powdered gelatin
• 2 tablespoons cold water
• 2 egg whites , room temperature
• 1/4 teaspoon pure vanilla extract
1. In a saucepan, combine the water, corn syrup, and sugar, bring to a boil until “soft-ball” stage, or 235 degrees on a candy thermometer.
2. Sprinkle the gelatin over the cold water and let dissolve.
3. Remove the syrup from the heat, add the gelatin, and mix.
4. Whip the whites until soft peaks form and pour the syrup into the whites.
5. Add the vanilla and continue whipping until stiff.
6. Transfer to a pastry bag.
Chocolate glaze:
• 12 ounces semisweet chocolate
• 2 ounces cocoa butter or vegetable oil
1. Melt the 2 ingredients together in the top of a double boiler or a bowl set over barely simmering water.
Milan Cookies
Recipe courtesy Gale Gand, from Food Network website
Prep Time: 20 min
Inactive Prep Time: 0 min
Cook Time: 1 hr 0 min
Serves: about 3 dozen cookies
• 12 tablespoons (170grams/ 6 oz) unsalted butter, softened
• 2 1/2 cups (312.5 grams/ 11.02 oz) powdered sugar
• 7/8 cup egg whites (from about 6 eggs)
• 2 tablespoons vanilla extract
• 2 tablespoons lemon extract
• 1 1/2 cups (187.5grams/ 6.61 oz) all purpose flour
Cookie filling
• 1/2 cup heavy cream
• 8 ounces semisweet chocolate, chopped
• 1 orange, zested
1. In a mixer with paddle attachment cream the butter and the sugar.
2. Add the egg whites gradually and then mix in the vanilla and lemon extracts.
3. Add the flour and mix until just well mixed.
4. With a small (1/4-inch) plain tip, pipe 1-inch sections of batter onto a parchment-lined sheet pan, spacing them 2 inches apart as they spread.
5. Bake in a preheated 350 degree oven for 10 minutes or until light golden brown around the edges. Let cool on the pan.
6. While waiting for the cookies to cool, in a small saucepan over medium flame, scald cream.
7. Pour hot cream over chocolate in a bowl, whisk to melt chocolate, add zest and blend well.
8. Set aside to cool (the mixture will thicken as it cools).
9. Spread a thin amount of the filling onto the flat side of a cookie while the filling is still soft and press the flat side of a second cookie on top.
10. Repeat with the remainder of the cookies.
Saturday, July 11, 2009
Calzones
Not the best picture, I must really work on my indoor photography. Or buy another camera. Lets not get me started on that.


They didn't brown light I thought they would but I think that might have something to do with the fact that I was using bread stick dough. Maybe next time I will make french bread dough and use that. But my favorite french bread recipe is not a bread machine so it's not as easy as this one.
This made 10 and between me and the kids there was none left over. I used peperoni inside but really I think you can use anything. The kids suggest more pepperoni, olives and ham. I think mushrooms would have been really good too.
Here is the recipe:
Calzones
Ingredients:
2 Loaves frozen bread dough (use soft Italian bread sticks)
1 1/4 Mozzarella cheese
5 cups Spaghetti sauce
Directions:
Thaw loaves
Divide each loaf into five parts each
Roll each dough piece on a floured board or stretch with your hands, making 10 7 inch squares
Fill with sauce, cheese and whatever else you want. Fold form a turnover, and pinch edges to seal.
Place on greased baking sheet.
Bake for about 15 minutes at 350
Turnovers will be golden brown when done
Judges say: 4 family members and 4 thumbs up.
Subscribe to:
Posts (Atom)